 I got The Art & Soul of Baking a few weeks ago and I've been dying to try it out. I even picked out a recipe to try before I even left the book store. So today I finally got to try it out. I tried out the Maple-Pecan Sticky Buns and boy are they yummy. Better than any sticky bun I ever got in a store. And this book is very informative. I learned a very specific way to make bread in class and after that I've graded every recipe book according to that method. And this book gets an A++.
This recipe is a two step recipe. Actually, kinda three step. But, it requires a recipe for Rich Breakfast Dough (recipe to follow) which they say can be used not only for these sticky buns but also coffee cake (which I can't wait to try). And this book has so many side notes and tips it's crazy. But good crazy.
Maple - Pecan Sticky Buns
The Art & Soul of Baking
by Sur la Table & Cindy Mushet
Ingredients:
1 recipe Rich Breakfast Dough
topping:
3/4 (3 ounces) unsalted butter, softened (65* - 68*F)
1/3 cup (2 1/2 ounces) firmly packed light brown sugar
1/3 cup ( 3 3/4 ounces) maple syrup (preferably Grade B) book offers explanation on another page
1 cup (4 ounces) chopped pecans
filling:
1/2 stick (2 ounces) unsalted butter, softened
1/3 cup (2 1/2 ounces) firmly packed light brown sugar
1/2 teaspoon cinnamon
Rich Breakfast Dough
Ingredients:
1/2 cup (4 ounces) warm whole milk (110* - 115*F)
1/4 cup (1 3/4 ounces) sugar
1 1/2 teaspoons active dry yeast or 1 1/8 teaspoons instant yeast
1 large egg plus egg yolk, at room temperature
2 1/2 cups (12 1/2 ounces) bread flour or unbleached all-purpose flour
1/2 teaspoon salt
1 stick (4 ounces) unsalted butter, very soft (not melted)
1 MIX AND KNEAD THE DOUGH: Combine the warm milk and sugar in the bowl of the stand mixer and sprinkle the yeast over the top. Whisk by hand to blend well. Let the mixture sit for 5 to 10 minutes, until the yeast is activated and foamy or bubbling.

Add the egg and yolk and whisk by hand until well blended. Stir in the flour and saltwith a silicone or rubber spatula. Attach the dough hook and knead on low speed for 2 minutes. The dough may look ragged at this point, but don't worry - the addition of butter will smooth it out. Increase the speed to medium and knead for 1 minute. With the mixer running, add the soft butter, 1 tablesppon at a time, allowing each addition to blend in before adding the next. Once all the butter has been added, decrease the speedto medium-low and continue to knead for 5 to 6 minuteslonger, until the dough looks soft and silky.
2 RISE THE DOUGH (FIRST RISE): Lightly butter or oil the tub or bowl, scrape the dough into the tub, and brush the surface of the dough with a little butter or oil. Cover with plastic wrap or a damp lint-free cotton towel and let the doughrise until doubled, 1 to 1 1/2 hours. If you are using a tub, be sure to mark the starting level of the dough with a pencil or piece of tape so it's easy to tell when the dough has doubled. at this point, the dough is ready to be punched down and used in your recipe of choice (in this case Maple-Pecan Sticky Buns).
1 MAKING THE TOPPING: Place the butter and brown sugar in the bowl of the stand mixer and blend on medium speed until the mixture is smoothand slightly lightened, 2 to 3 minutes. You can also use a hand mixer and a medium bowl, though you may need to beat the mixture a little longer to achieve the same results. Scrape down the bowl. With the mixer running on medium, pour the maple syrup in a thin stream down the side of the bowl and blend until smooth and homogenous. Scrape the topping into the cake pan (10" cake pan) and spread evenly. Scatter the chopped pecans over the top. Set aside while you make the buns.

2 ROLL THE DOUGH: Dust your work surfacewith flour. Turn the risen dough out of the tub and onto the flour. Press down firmly with your hands to expel as much of the gas as possible, but don't knead the dough or the gluten will be too developed for the dough to roll easily. Dust the top of the dough with flour. Roll the dough into a 10- by 16-inch rectangle. Position the dough so that one of the long sides in parallel to the edge of your work surface. Brush any remaining flour from the surface and underside of the dough.
3 MAKE THE FILLING: Place the butter, brown sugar, and cinnamon in the bowl of the stand mixer and blend on medium speed until the mixture is smooth and slightly lightened, 2 to 3 minutes. Scrape down the bowl. Use a silicone or rubber spatula (I used my hands) to spread the filling over the dough, leaving a 1-inch border along the long side opposite you (I did it the opposite way because I work the opposite way)
4 SHAPE THE BUNS: Beginning with the long edge closest to you, roll the dough into a cylinder, gently tucking and tightening as you roll (this is how I worked opposite, I started with the side opposite me and rolled toward me. It feels easier to me). Wet your fingers and rub a thin film of water along the empty border. Finish rolling the dough onto the border. Roll the dough backwards so that the seam is facing upward and pinch all along it to seal the dough. Turn the seam side down and use a chef's knife to cut the roll into 10 equal pieces. Set each bun with a cut side upon your work surface and gently flatten it slightly with the palm of your hand. Place the buns into the prepared cake pan, spacing them evenly.
5 PROOF THE DOUGH (SECOND RISE): Cover the pan loosely with plastic wrap or a damp lint-free cotton towel and set asideto rise until the rolls have almost doubled in size, 45 to 60 minutes (longer if the room is cold).

6 BAKE THE STICKY BUNS: Preheat the oven to 350*F and position an oven rack in te center. Bake the buns for 30 - 35 minutes (took me 45 minutes), until the buns are deep golden brown and the centers register 185*F on an instant read thermometer.
 Transfer to a cooling rack for 5 minutes, then turn the buns out of the pan. To do this, run a knife or small spatula around the edge of the pan to loosen the buns. Place a large plate or rimmed baking sheet upside down on top of the cake pan. Wearing oven mitts, hold the cake pan against the plate and invert it.
  The sticky buns will fall out of the pan onto the plate, along with their syrup and nuts. Serve the sticky buns warn or at room temperature.

P.S. Thank you for all the kind words about my wedding cake. The bride and groom loved it.


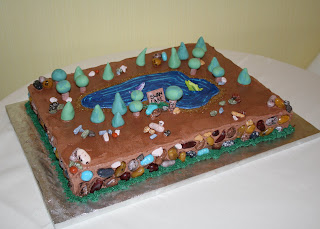 The groom's cake was fun to do and came out cute. I was originally going to put this little novelty fisherman on the cake but it didn't fit in with everything else so I left it off. But there are some cute personal touches on the cake: the lake is in the actual shape of the lake that the groom grew up on, there's little wooden sign saying "Swan Lake" and there's a tree on the cake with the bride and groom's initials.


 Not much to say today except that I got a major bug and got busy in the kitchen. I saw this on


 The
The 
.JPG)


